

How to remove spare tire without crank? As a car owner, it’s essential to know how to remove the spare tire in case of a flat tire or other emergency situations. However, what if the crank, the tool used to release the spare tire, is missing or inaccessible? Don’t worry; we’ve got you covered. In this article, we’ll discuss the importance of removing a spare tire without a crank, safety precautions, assessing the spare tire mounting system, and various methods to remove the spare tire without a crank. So let’s get started:
Removing a Spare Tire without a Crank
Removing a spare tire without a crank is crucial in situations where the crank is missing, damaged, or inaccessible. It’s important to note that not all vehicles have a spare tire crank, and in some cases, the crank may be missing or damaged during purchase or rentals. Moreover, if the crank is not properly secured, it may be stolen or lost, leaving you stranded with a flat tire.
Safety Precautions
Before you start removing the spare tire, it’s important to prioritize safety. Always park your vehicle on a level surface, engage the parking brake, and use wheel chocks to prevent the vehicle from rolling.
Wear gloves and eye protection to avoid injury from sharp edges or flying debris. Consult your vehicle’s owner’s manual for specific safety instructions related to spare tire removal, as we have seen done for Mini Cooper and Kia Telluride.
Assessing the Spare Tire Mounting System
The first step in removing the spare tire without a crank is to assess the spare tire mounting system. There are three common types of spare tire mounting systems as I have come across:
- Cable release system
- Interior panel release system
- Under-vehicle release system
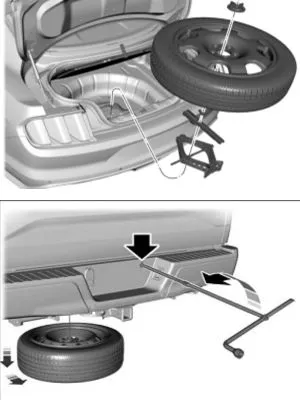
To know which one is there in your vehicle? Inspect your vehicle’s spare tire mounting system to determine it. If you’re unsure, consult your vehicle’s owner’s manual or look for visual cues.
Methods to Remove a Spare Tire without a Crank:
Now that you’ve assessed the spare tire mounting system, it’s time to explore the different methods to remove the spare tire without a crank.
Method 1: Cable or Strap Release
If your vehicle is equipped with a cable or strap release system, you’ll need to locate the release lever or tool to free the spare tire from its mount. The release lever or tool is typically attached to the spare tire carrier or located nearby. Its purpose is to disengage the cable or strap that secures the spare tire in place.
To begin, carefully inspect the spare tire carrier and surrounding area to identify the release lever or tool. It may be a small lever, a metal rod, or a plastic tool with a hook or claw end. If you’re still unsure, consult your owner’s manual or look for instructions on the spare tire carrier. Some vehicles may require a specific tool, so it’s essential to follow the manufacturer’s guidelines to avoid damaging the system or injuring yourself.
Once you’ve located the release lever or tool, grasp it firmly and pull it towards you. This action should disengage the cable or strap, allowing you to remove the spare tire from its mount. Be cautious, as the spare tire may be heavy or awkward to handle, so consider enlisting the help of a friend or using a spare tire changing tool for added leverage.
Method 2: Interior Panel Removal
For interior panel release systems, the first step is to remove the interior panel to access the spare tire. This requires locating the screws or clips that hold the panel in place and removing them. The screws or clips may be hidden behind trim pieces or panels, so carefully inspect the area around the spare tire to identify their location.
Before removing the screws or clips, take a moment to assess the surrounding area and ensure that you’re not damaging any critical components. You don’t want to accidentally damage wiring, brake lines, or other vital systems. If you’re unsure, consult your owner’s manual or seek guidance from a professional mechanic.
Once you’ve located the screws or clips, use the appropriate tool to remove them. For screws, a screwdriver or socket wrench should work well. For clips, you may need a specialized tool or a flathead screwdriver to pry them loose. Be gentle, as you don’t want to strip the screws or damage the clips.
As you remove the screws or clips, take care not to drop them into inaccessible areas. It’s also a good idea to have a magnetic screwdriver or a small container to catch the screws or clips as they come loose. This will prevent them from getting lost or falling into crevices where they may be difficult to retrieve.
Once the screws or clips are removed, gently pry the interior panel away from the spare tire. Be careful not to damage the surrounding components or the panel itself. You may need to disconnect electrical connectors or hoses, so take your time and work carefully.
With the interior panel removed, you’ll finally have access to the spare tire. From here, you can follow the appropriate steps for your vehicle’s spare tire mounting system to remove the tire and replace it with a fully inflated spare or the flat tire that was removed. Remember to secure the interior panel in place once the spare tire is removed to prevent it from moving around while driving.
Method 3: Under-Vehicle Access
If your vehicle is equipped with an under-vehicle release system, you’ll need to access the spare tire from beneath the vehicle. This requires careful planning and execution to ensure your safety and the safety of your vehicle.
The first step is to locate the spare tire and assess the area around it. Look for any covers, brackets, or other obstructions that may be blocking access to the tire. You may need to remove these items before you can access the spare tire.
Next, position a vehicle jack and jack stand under the vehicle to safely elevate it. Make sure the jack and jack stands are rated for your vehicle’s weight and that they are positioned correctly to provide stable support.
Once the vehicle is elevated, carefully crawl underneath it to locate the spare tire. Be cautious, as the space underneath the vehicle can be cramped and potentially hazardous. Use a flashlight to illuminate the area, and avoid any loose objects or sharp edges that could cause injury.
Once you’ve located the spare tire, inspect it to ensure that it’s properly secured and not damaged. If the spare tire is covered by a protective cover, we have to remove it carefully to avoid damaging the tire. If the spare tire is secured by brackets or clips, then remove them using the appropriate tools.
With the spare tire accessible, follow the appropriate steps for your vehicle’s spare tire mounting system to remove the tire and replace it with a fully inflated spare or the flat tire that was removed. Be careful not to damage any surrounding components or the tire itself.
When you’re finished, carefully lower the vehicle to the ground using the jack and jack stands. Make sure the vehicle is stable and secure before removing the jack and jack stands.
Method 4: Seek Professional Assistance
If none of the above methods are feasible, it’s best to seek professional assistance. Some vehicles have unique spare tire mounting systems that require specialized tools or expertise. Contact a certified mechanic or roadside assistance service to safely remove the spare tire.
Conclusion
Removing a spare tire without a crank is a valuable skill to have in emergency situations. Remember to prioritize safety, assess the spare tire mounting system, and choose the appropriate method for your vehicle. If you’re unsure or encounter difficulties, don’t hesitate to seek professional assistance. Practice the removal procedure in a safe environment to ensure you’re prepared for any situation.

I am Kashif Riaz – founder and author at Tiremonk.com. I am an automotive DIY enthusiast and tire blogger with a background in Mechanical Engineering. I have been in the field for more than seven years. I love to write about automobiles, especially about their tires – design, construction, functioning, and maintenance.
2 thoughts on “How to Remove Spare Tire Without Crank: A Comprehensive Guide”